SGI Indy on the Internet
A few assumptions about who will be using this guide
This guide was written from the perspective of someone who lives in the
UK, has a telephone line in their room for their use only, is using an
SGI Indy running IRIX 6.5.6, and whose ISP uses PPP
(Point-to-Point Protocol). Further investigation has now been made into IRIX
6.2 and the sections added to this page; also this guide should
apply to almost any SGI desktop workstation in the Indy, Indigo and
Indigo2 range. No investigation has been made into SLIP or other
methods of connecting to the internet so this document does not cover
those methods. Give the document a quick scan first as I'd hate to be
responsible for any disappointments or injuries. All pictures in this
guide were taken with a blue backdrop for clarity of viewing only, and
the soldering iron was not turned on while taking the pictures. Under
no circumstances should you use a soldering iron where it may come into
contact with flammable materials such as baggy clothing, long hair,
paper or carpets etc.
Tip: Under IRIX 6.2 it will be necessary to edit
several files. The easiest way to do this for a beginner is to use a
GUI (Graphical User Interface) editor such as jot, which can be found
in the Applications icon catalogue which is in Toolchest -> Find
-> Applications. Or you could type in a shell window jot filename
where filename is the complete path
and filename of the file to be edited (eg jot /etc/uucp/Devices).
A quick shortcut when done editing is to hold down Ctrl and
press s then let go, then hold down Ctrl
and press q then let go, which will save the file and exit jot.
Check out my FAQ for additional specific info.
There is also a text only version of this
guide.
Contents:
Where to start?
Secondly
Before making your own modem cable
Making your own modem cable
Setting up the modem under IRIX 6.5.6
Setting up the modem under IRIX 6.2
Connecting to the Internet - IRIX 6.5.6, IRIX 6.2
Appendix A - Modems supported under IRIX 6.5.6
Appendix B - Soldering tips
Appendix C - Troubleshooting
Appendix D - Version of IRIX 6.2 & patches installed
What not to do!(Please read this first!)
Please email me with suggestions or
requests and I'll see what I can do.
Where to start?
Firstly you need a modem, preferably one which is already supported by
SGI under IRIX 6.x. See appendix A for a full list which is supported
as standard under IRIX 6.5.6. In this document I use the word 'modem'
to refer to my US Robotics 28,800 Sportster fax modem with V.34 and
V.32bis, but other modems should follow a very similar setup procedure
(especially under 6.5.6 with GUI!)
Secondly
You'll need to either buy (expensive) or make (cheap!) a modem cable to
go from your modem to one of the serial ports on the rear of the
computer. To buy one you'll need to contact SGI or a reseller directly
as I do not know of anyone else who will supply the correct cable spec. WARNING!!
Do not be fooled into thinking that an Apple Mac modem cable will work
just because it fits and the lights come on! This was one problem I
encountered when I tried to get my modem to work (which I discovered
later had a hardware fault).
Before making your
own modem cable
Before venturing into the world of soldering and multicoloured wires,
there are a few things you will need; to start with, make sure that the
modem works! I cannot stress this enough as no matter how well you make
the cable it just ain't gonna help if the modem is faulty! Test it on a
friends computer first (PC, Mac or SGI, they all use the same modem
commands) and then you'll know it's not your modem if it doesn't work!
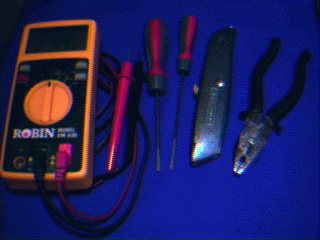 Also required
will be some basic tools: two small flat bladed screwdrivers, some form
of wire strippers (normal pliers will do), a sharp knife or wire
cutters, a continuity tester (found on most multimeters), a decent
soldering iron, at least 25 Watt, with a reasonably small tip and a
damp sponge to clean the tip on, some resin core solder (quality solder
makes a lot of difference, Multicore is good stuff to use) and some
basic soldering skills. Maplins will be able to supply most of this
stuff, and while you're there get yourself an Apple Mac modem cable
which will be magically transformed into an SGI modem cable!
Also required
will be some basic tools: two small flat bladed screwdrivers, some form
of wire strippers (normal pliers will do), a sharp knife or wire
cutters, a continuity tester (found on most multimeters), a decent
soldering iron, at least 25 Watt, with a reasonably small tip and a
damp sponge to clean the tip on, some resin core solder (quality solder
makes a lot of difference, Multicore is good stuff to use) and some
basic soldering skills. Maplins will be able to supply most of this
stuff, and while you're there get yourself an Apple Mac modem cable
which will be magically transformed into an SGI modem cable!
I recommend that the work is done on a solid table with a surface which
doesn't matter if it gets scratched, such as a chopping board.
Making your own modem
cable
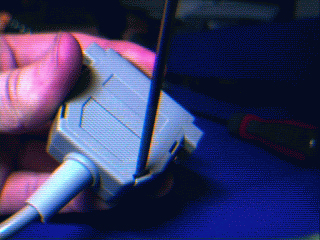
Preparing the cable
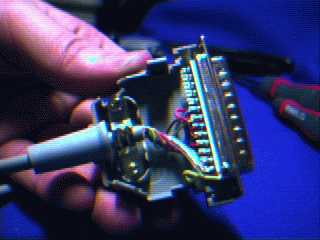
Open the 25 way D-type serial end of the cable using the two
screwdrivers by easing the tabs out and gently pulling the case halves
apart, making sure not to loose the fixing bolts if you want to fix the
cable to the modem at any time. To keep the casing from clipping back
together carefully insert the second screwdriver into the case (so that's
what it's for!) Be careful not to stab yourself when applying
pressure. Keep all the casing parts together to one side until needed
later.
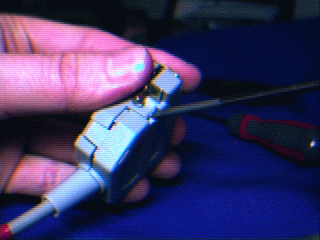
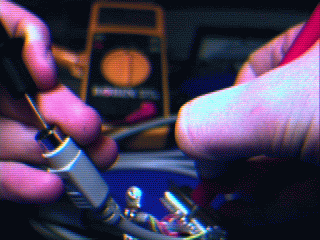 Using the
multimeter, test the continuity of the wires to make sure you know
which colour goes to which pin number on the 8-pin mini din plug,
writing down what pin each coloured wire corresponds to; during my
experience of two mac modem cables there was only one wire which was
purple instead of grey. You can check your results against mine which
are shown in a diagram
later in this guide.
Using the
multimeter, test the continuity of the wires to make sure you know
which colour goes to which pin number on the 8-pin mini din plug,
writing down what pin each coloured wire corresponds to; during my
experience of two mac modem cables there was only one wire which was
purple instead of grey. You can check your results against mine which
are shown in a diagram
later in this guide.
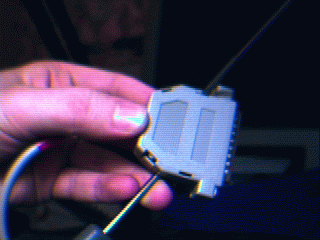
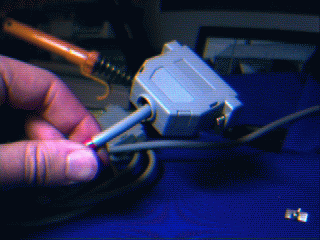
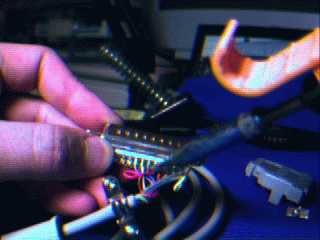 Desolder
all of the wires (except for the frame ground wire going to pin one),
one at a time, from the 25 way D-type connector by heating the solder
on the pin troughs and as soon as it has melted gently pull the wire
away (or push it away with the soldering iron). CARE should be
taken not to flick solder into your eyes when doing this as it can
happen very easily! If you are worried about this then use some
workshop or laboratory eye protectors.
Desolder
all of the wires (except for the frame ground wire going to pin one),
one at a time, from the 25 way D-type connector by heating the solder
on the pin troughs and as soon as it has melted gently pull the wire
away (or push it away with the soldering iron). CARE should be
taken not to flick solder into your eyes when doing this as it can
happen very easily! If you are worried about this then use some
workshop or laboratory eye protectors. 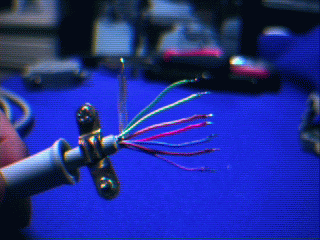
Tidy up the wire ends so that they are neat and don't have too much
bare wire showing (picture) otherwise there is a possibility of
shorting pins when it is assembled (see appendix B
- soldering tips) If you were careful in desoldering the wires they
shouldn't need much tidying up.
Before reconnecting the wires make sure that the sheath is on the
cable! I forgot about mine and look what happened.....
Reconnecting the wires
Following the diagram, solder each wire in turn to the correct pin
trough, applying extra solder to make a good connection. Make sure
there is no loose solder and that the pins are tidy
NB: This diagram represents the actual plug looking at the pins, not
the port itself. The 25-way D-type connector should have numbers next
to each pin, but they are very small and difficult to see; as a general
guide, looking at the 'back' of the port (where the wires connect to),
the pins are laid out as follows: pin 1 is top right, pin 13 is top
left, pin 14 is bottom right, and pin 25 is bottom left.
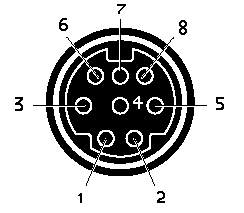
Cable pinout assignments for Indy & Indigo2:
| Pin (8 pin mini-din) |
Assignment |
Description |
Wire colour |
Pin (25-way) |
| 1 |
DTR |
Data Terminal Ready |
Black |
20 |
| 2 |
CTS |
Clear To Send |
Brown |
5 |
| 3 |
TD |
Transmit Data |
Red |
2 |
| 4 |
SG |
Signal Ground |
Orange |
7 |
| 5 |
RD |
Receive Data |
Yellow |
3 |
| 6 |
RTS |
Request To Send |
Green |
4 |
| 7 |
DCD |
Data Carrier Detect |
Blue |
8 |
| 8 |
SG |
Signal Ground |
Grey |
7 |
This pinout applies to Indy, Indigo, Indigo2, Challenge S, Challenge M,
Power Challenge M, and the MENET 4-Enet, 6-serial board (XT-FE-4TX-6A)
Finishing off
Place the 25-way D-type connector in the housing making sure to
position the sheath and clamp in the correct positions, then insert the
bolts and clip the casing together. If anything falls out of place it's
a simple matter to re-open it and try again; it is worth getting it
right as a sloppy job may cause difficulties later.
Connect the cable to the modem and to the computer serial port and
you're ready to set up the modem.
Setting up the
modem under IRIX 6.5.6
Under 6.5.6 it is a very easy matter to set up the modem using a
GUI(Graphical User Interface) and selecting the relevant options. Go to System
on the tool chest, then System Manager, Hardware and Devices, Add
a Modem (in the serial devices section) Follow the steps through,
giving the modem a name and selecting a serial port, then identify your
modem from the list (if it is not there click on More Choices),
choose the speed (for my 28,800 USR I chose 19200 as this is the
highest speed supported by both the modem and the port, the Indy port
speed goes from 19200 straight to 38400 which would give errors with
the modem, so 19200 it is). If you chose the modem type correctly a
string of relevant AT commands should already be in the Command String,
best not to play with this at all! For regular internet access via an
ISP, Dial Out is all that is needed.
If all has been successful then when you click on OK it should talk to
the modem briefly and say that the installation was a success. You can
test the modem manually at this point if you like by entering a command
shell and typing cu n where n is
a telephone number that you know works (beware that whoever picks up
the phone will get a loud screeching noise in their ear!), you should
hear the modem dialling if it has an internal speaker and the volume is
sufficiently loud, and who/whatever picks up the phone.
Setting up the
modem under IRIX 6.2
This is slightly more complex than the method used under IRIX 6.5.6 as
there is no GUI, so you have to edit the relevant files and run various
commands manually, but you should only have to do this once so it's not
so bad!
The following information is a cut down version of what is in the
online books so if you want to learn more you should look at IRIX
Admin: Peripheral Devices, Terminals and Modems, Installing a Modem,
but if you're like me and can't be bothered sifting through all the
padding or you don't quite understand it, read on.
PPP and UUCP Utilities
Before going any further you will need the ppp and uucp utilities
installed on your system, it would also be a good idea to have gone
through the EZsetup utility from the visual login screen to set up a
unique network address and machine name. The ppp and uucp utilities
should be on the IRIX 6.2 installation media (actually on cdrom 1 of
2). To check if they are installed, type in a shell:
versions | grep uucp
the output should contain the following:
I eoe.sw.uucp UUCP Utilities
If this is not present you will need to install it from your
installation media. Otherwise continue!
Make sure you're logged in as root, and edit /etc/inittab to turn off
the port you intend to use for your modem. The line you're looking for
will look something like this:
t1:23:respawn:/sbin/getty -N ttyd1 co_9600 # port 1
Change respawn to off. If it is already off then leave it
as it is. Write and exit the file (shortcut: Ctrl s, Ctrl q) then type telinit
q in a shell and press return. The next step is to run the modem
configuration script for your modem, the one that I used for my
USRobotics Sportster 28800 was as follows:
/etc/uucp/fix-usr -o -m SPORT -s 19200 1
and this translates as follows:
-
fix-usr is the modem script as found in /etc/uucp along with
the other modems supported by SGI. These scripts need to be examined
for the model keywords, speeds available, and general usage
information, unless you happen to have exactly the same modem as in the
example.
-
-o stands for outgoing only, i.e. the modem will not answer
incoming calls.
-
-m denoted the model, this example shows it is the SPORTster
model.
-
-s is for the speed
-
1 represents serial port 1
When this script is run properly it sends a series of signals to the
modem and attempts to reprogram the NVRAM in the modem so that it will
talk to the SGI properly, it will show any dip switches that ought to
be changed and keep you informed of what it is doing.
The next step is to configure the dial-out software. Edit the
/etc/uucp/Devices file, adding the following lines to it:
ACU ttyf1 null 19200 212 x usr
Direct ttyd1 - 19200 direct
Direct ttyf1 - 19200 direct
Briefly,
-
ACU is the name that you wish to give the modem, it is
generally called ACUsomething;
-
ttyf1 is from the tty subsystem, the 1 represents the
serial port to be used, see the online books for a more detailed
description;
-
19200 is the speed, and should be the same as previously
specified;
-
usr is the field found in the /etc/uucp/Dialers file under
the heading for your particular modem (usr - USRobotics)
See the help contained in /etc/uucp/Devices and the online books for a
better description of what each field is for and other options. Write
and exit the file before moving on.
Change the ownership of the devices file by typing in a shell:
chown uucp /dev/ttyf1
And that should be it! If all has gone well you should be able to use cu
to dial a telephone number through your modem, but please be
considerate if calling a phone that will be picked up by a human being.
It is not mandatory to test the modem at this time as the next step,
setting up PPP, shouldn't take long; it just depends how confident you
are!
Connecting to the
Internet
To begin with you must contact an ISP and ask to speak to their
technical support staff (preferably a free phone number as this could
take some time!) and kindly explain to them that you have a unix
computer which you would like to connect to their server, and you need
the following information (have a pen and paper ready):
-
Dial-up number (a local call number, they ought to have at least two
you can dial)
-
login name (may have to have an account created for you, or you may
have to go to an internet cafe to do it yourself)
-
login password (you should be able to choose this, then change it when
you log on)
-
Primary DNS (195.44.0.12)
-
Secondary DNS (195.44.0.13)
-
Authentication protocol (PPP with PAP & CHAP)
-
E-mail incoming server (pop3.cwcom.net)
-
E-mail outgoing server (smtp.cwcom.net)
-
News server (news.cwcom.net) on port 80
-
ISP home page (www.cwcom.net)
The text in brackets is the information the guy gave me for my
connection to Cable & Wireless's internet service provider, use
them as examples only please. The guy I spoke to also gave me their
gateway (0.0.0.0) and proxy web server (proxy.cwcom.net) addresses but
I found that I didn't need these. You might also explain that you will
be using Netscape and Netscape Messenger if you intend to use them, it
might make them feel more at home. If they start asking you about
profiles for mail addresses, these liken to users on an SGI system so
explain that each user has their own home directory with their own set
of preference files for every program they use, and this is where each
users mail preferences will be stored. Having profiles is Windows' way
of getting round the problem of not having 'proper' user accounts.
Setting Up PPP Under IRIX 6.5.6
Open up the System manager if it is not already open, go to Networking
and Connectivity, Add an Outgoing PPP Connection (in the PPP
management section) and enter the dial-up number, login name, login
password, Primary DNS, Secondary DNS, Authentication protocol (PAP
& CHAP on my system) in the relevant boxes. Set local and remote IP
address to 0 (the ISP will assign these when you log on)
If the ISP offers you several e-mail addresses the way to organise
these is to fill in the e-mail usernames differently for different
users on your computer, eg. if you have e-mail addresses that go
mailuser1 mailuser2 mailuser3, set up user accounts on your computer
with the Netscape preferences incorporating the relevant mail username
for each one. As an example of this my setup is such that when I log
into my Indy as jonathan, my mail username is mail00; if I set up
another user account on my Indy I could have the same mail username or
I could have mail01 as the mail username in Netscape preferences.
Setting Up PPP Under IRIX 6.2
As with the modem setup procedure, this is a matter of editing files
and running shell commands. Here is where the parts come together and
begin to make sense.
Again, for a more detailed guide and description of what things do, see
the online book IRIX Admin: Networking and Mail, SLIP and PPP.
Edit the /etc/uucp/Systems file, adding a line similar to the following:
cw Any ACU 19200 08453088860 "" @\r\c
where
-
cw is the arbitrary name that I gave to the ppp connection
-
Any means it can be used at any time of the day or night
-
ACU is the name of the modem, as entered in the
/etc/uucp/Devices file
-
19200 is the connection speed, which should match the
previously specified modem speed
-
08453088860 is the number given to me by my ISP for
connection to their system
-
"" @\r\c is the login script, details about
options for which can be found in /etc/uucp/Dialers
Write and exit the file.
Edit /etc/ppp.conf so that it contains the information required to log
into your ISPs computer. Your ISP may have specific requirements, so
make your own additions/removals as required to the example below;
cw send_name=loginname
   send_passwd=loginpassword
   localhost=0,0
   send_chap
   send_pap
   add_route
loginname and loginpassword will either be supplied by
your ISP or created yourself if you previously made an account with an
ISP online.
Finally, add the Domain Name Server address(es) given to you by your
ISP to /etc/resolv.conf (you may need to create this file) so that it
looks something like this:
nameserver 195.44.0.12
nameserver 195.44.0.13
Write and exit the file.
Restart the system!
To start your ppp connection, make sure the modem is switched on and
enter in a shell:
ppp -r cw
(cw is the name you gave the ppp connection earlier)
and the modem should begin dialling. Within a few seconds you should
hear some warbling noises as the modems talk to each other and the
SD/TR lights will flash briefly a few times then go out, and the RD,
CS, and ARQ lights should stay lit. You should see output from ppp
similar to the following:
ppp[1045]: cw IPCP: ready 195.44.20.19 to 195.44.0.41
The IP addresses here are dynamic so they change each time I log on to
their server. If all is well no more messages should appear. See the Appendix C - Troubleshooting if your
connection fails or times out after about a minute.
To use Netscape and Netscape mail you will need to insert the mail/news
server addresses and your email address etc into Netscape preferences,
then exit and restart Netscape.
Important! In order to terminate the session, I have found the
only way is to kill the process (in the square brackets after ppp,
shown above) so to do this type in a spare shell:
kill 1045
where 1045 is the process number (displayed after
"ppp" in square brackets), and ppp should terminate the call
and return an exit message similar to "received signal 15"
then quit, returning to the shell prompt. The modem should have just
the CS light lit (or whatever lights were lit before the connection
began).
Appendix A - Modems supported under
IRIX 6.5.6
This is a very long list! Download the text file here.
Appendix B - Soldering tips
Tidying up wire ends
To effectively do this it is recommended to cut the ends off all the
wires so that they are all the same length and strip approximately 2mm
only of the sheathing off, give the bare wire a quick twist then tin
it.
Tinning
Tinning is a term which refers to making solder stick to a metal
surface or object such as a wire or piece of metal. To tin, apply heat
to the object such that when solder is pushed against it the solder
begins to melt and adhere to the surface. The closer to the soldering
iron the solder is pushed the better, as the heat is hottest there.
Tinning wire ends
To tin a wire end, first it should be clean and twisted; hold the
soldering iron so that it is heating the bare wire and gently push the
solder onto the wire AND the soldering iron so that it melts and
'seeps' into the twisted wire. Remove the heat as soon as it has gone
into most of the bare twisted wire, checking on the reverse side as
well. If more solder is required simply repeat the process.
What not to do!
Do NOT leave the soldering iron on the floor or balanced on a
table edge! This can lead to burnt carpets or arms/legs/hands. A proper
soldering iron station should be used which are not expensive at all
(usually comes with a sponge too)
Appendix C - Troubleshooting
So it all went tits up? Well don't fret, it happened to me lots of
times! There are many things you can check, so check this list:
-
Modem cable is built to correct spec;
-
Modem is known to be in good working order;
-
Modem is one of those supported by SGI. If this is not the case try
using the hayes24 script in place of the references to USRobotics in my
examples. If it still does not work you may need to create your own
profile, the method for which is described in the /etc/uucp/Dialers
file, see also any relevant man pages and the online books;
-
The information added to the edited files was not typed in correctly,
or was not correct;
-
You are sending the correct authentication/username/password
combination in /etc/ppp.conf (connection will time out if incorrect);
-
Your modem is plugged into a working telephone wall socket;
-
The telephone number is correct in /etc/uucp/Systems and includes any
dial-out prefix;
-
You have previously created an account with your chosen ISP (could be
done on any computer);
The files that need to be changed generally have some good help and
guidelines in them, as well as the online books. If you feel you are
missing some information then check SGIs techpubs site at techpubs.sgi.com If you are still
stuck you could always try the newsgroups on SGI and IRIX Admin,
there's usually someone there who can help.
Appendix C - Version of IRIX 6.2
& patches installed
When this guide was made the following version of IRIX 6.2 was
installed:
IRIX 6.2 with IMPACT 10000
Plus these patches.
The chkconfig list looked like this.
It is recommended that you have these patches and version installed if
possible as they improve a lot of the functionality dramatically and
help stabilize the system.
The above procedure has also been tried with a fresh install of IRIX
6.2 with no patches and it worked fine. On a 1GB disk there was
approximately 500MB free with a default installation plus the uucp
utilities and ppp software.
This document and all pictures (except for port diagram) were created
by Jonathan Mortimer, year 2000. Last updated 16th March 2001
I make no claims to the appropriateness or correctness of the
information contained within this document, and any injuries or damage
caused by following this advice is entirely not my fault.
[back to The Gateway]